Sunday, February 19, 2012

Snow Day!

Finally...there is enough snow to go for a play day! We drove up the hill to play in the snow at the picnic area in Kings' Canyon and had a blast! We built a snowman, a fort of snowballs, threw snowballs, ate lunch, made a sled run and enjoyed each other's company! Audrey had a bit of a sick stomach and spent most of the day relaxing in the car (which is why, consequently, there are photos with cars in the background...we didn't stray far from the parking lot), but we did get at least one good photo of her! Randy had fun behind the lens of his camera as well. He is still learning the nuances of his new gear but I think he took some pretty good shots for the day. Here are my favorites!
Photobucket
Heading out to find a good hill to make our snow run.
Photobucket
Photobucket
Direct hit!
Photobucket
Photobucket
Nia learned that she liked snow...to eat it, I mean!
Photobucket
Photobucket
Photobucket

Wednesday, February 15, 2012

Meyer Lemon Curd Pie

Photobucket
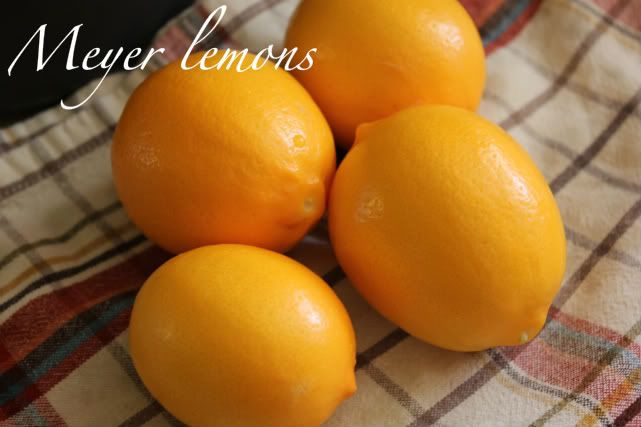
This is a twist on a traditional lemon meringue pie that I made last weekend for some friends. In order to make the curd (the filling) you start with a few Meyer lemons. Really, any lemons will do, but Meyer lemons are my absolute favorite. Their mellow flavor is unbeatable! Thanks to my wonderful friend, Andrea, I had a bunch of freshly picked lemons on my counter!
Photobucket
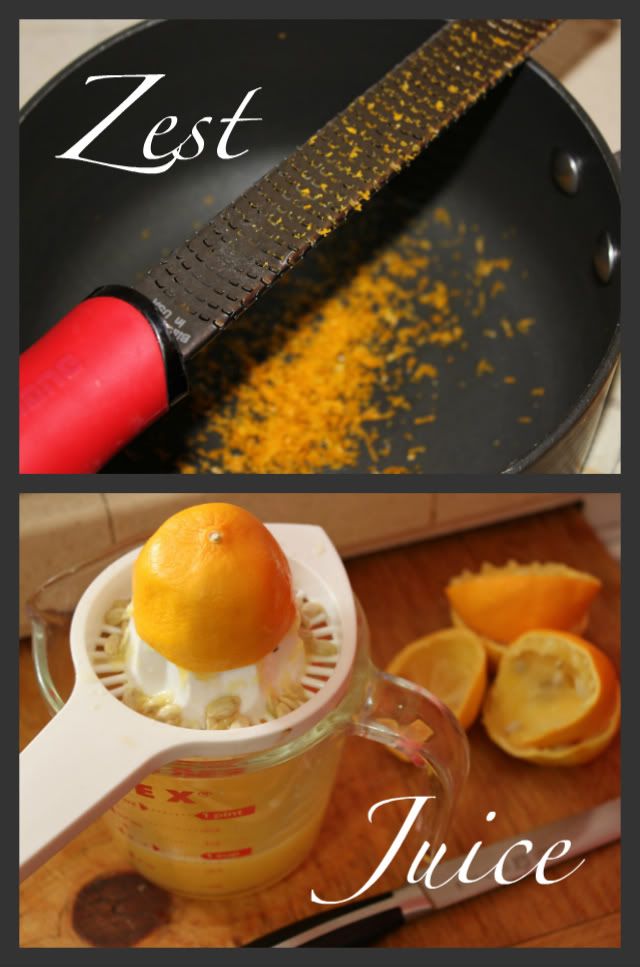
Wash them, then zest one large one before juicing enough of them (2 or 3) to make 1/2 cup of juice.
Photobucket
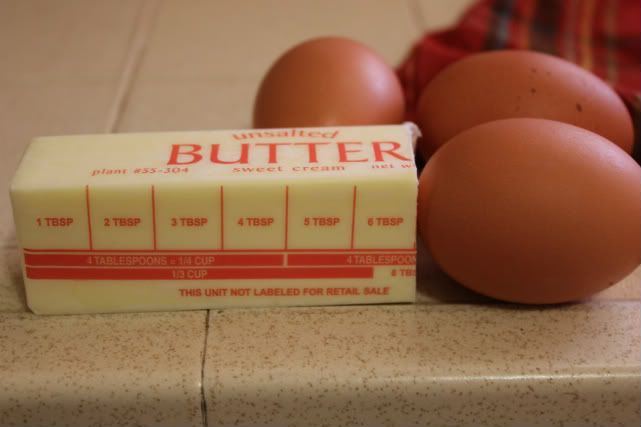
In the same pot as the zest, add 6 TBSP butter and 1/2 cup sugar and put it over low heat on your stove to melt. In another bowl whisk 3 eggs.
Photobucket
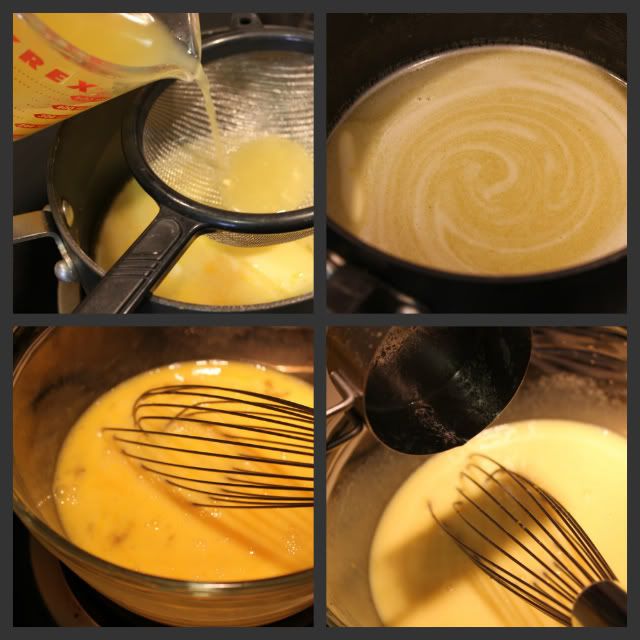
Now if you've never tempered eggs before, this can be a little bit tricky step. Hopefully my photos and explanation will help. Pour the lemon juice through a strainer into the butter and zest mixture. The strainer will catch any little seeds or pith that the juicer didn't get. Whisk the three ingredients until incorporated. Once the butter is melted completely, the mixture is ready to add to your eggs. Take a half cup of the hot butter mixture and while you are whisking the eggs (remember, they're in a separate bowl), you slowly pour in the hot liquid. Repeat that step, whisking the whole time (you don't want little pieces of cooked, scrambled eggs in your curd...yuk). Then take the whole egg mixture and slowly incorporate that back into your pan, whisking the butter mixture in the pan while you pour. Now you've got all your ingredients in one pot, the butter, sugar, juice, zest and eggs. Keep whisking over low heat until it starts to thicken into a custard.
Photobucket
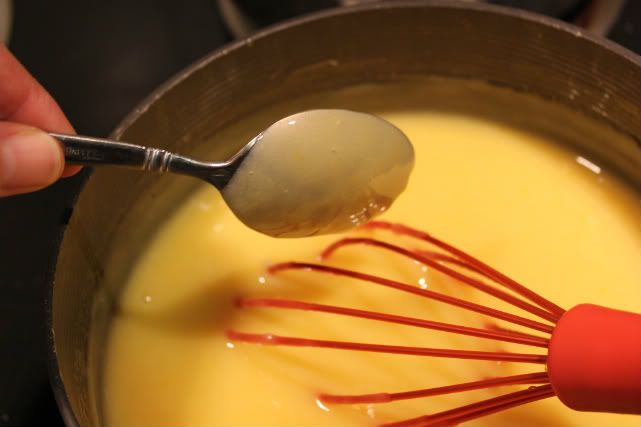
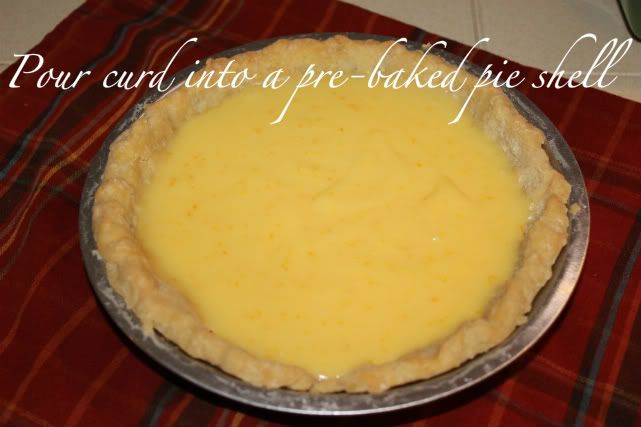
To check if your curd is thick enough, dip in a spoon and if the curd coats and sticks to the back of your spoon, it's done. You are welcome to keep whisking if you want it a bit thicker (although it will thicken up a bit more as it cools). Remove from heat and let cool to room temperature before pouring into your pie shell. It won't fill the crust all the way. The curd is so rich, you only need a bit, it's more like the amount in a tart. If you want to know what pie crust I like to bake with, you can find the exact recipe and tutorial here. This is the exact same recipe that my friend, Jane Harms, has used for years and was kind enough to share it with me when I got married. I'm not sure how Pioneer Woman got a hold of it, but her post, complete with pictures, is a big help when I want to share it with others! Put the pie crust, now filled with curd into the fridge to cool while we make the meringue.
Photobucket
Some cookbooks refer to this type of meringue as Italian. I actually got this recipe from a Mexican cookbook to top a tres leches cake. Either way, it's fabulous! And I don't even like traditional meringue.
Photobucket
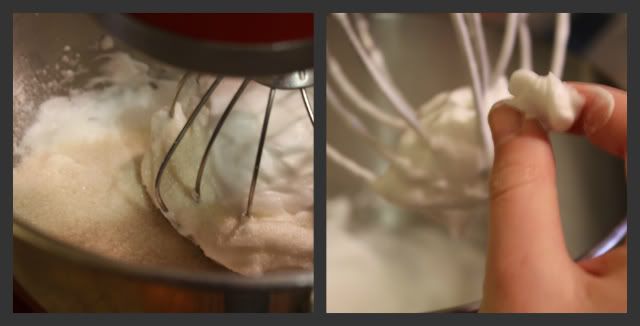
In a standing mixer, beat 3 egg whites and 1/4 tsp cream of tartar until soft peaks form (about 4-6 min). Add 3 TBSP sugar and beat another 8-10 minutes, until stiff peaks form. Check to make sure your sugar is fully dissolved into your egg whites by taking a bit in your fingertips and rubbing to make sure it doesn't feel gritty (since I used raw cane sugar, this was an important step).
Photobucket
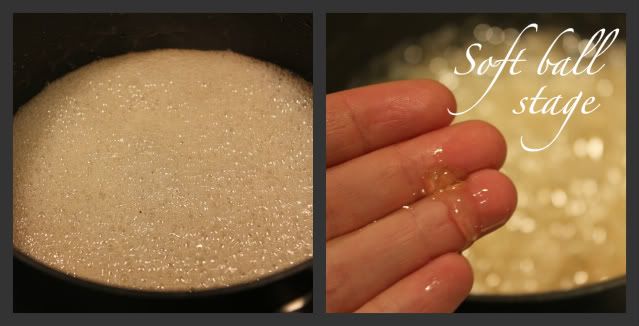
While your egg whites are beating, put a saucepan on the stove over high heat. Combine 1/2 cup water, 3/4 cup + 1 TBSP sugar and 1/4 tsp cream of tartar. Cover and cook for two minutes. Uncover and cook for about 6 minutes more, or until the mixture reaches the soft-ball stage (239 degrees on a candy thermometer). Since I don't have a candy thermometer I dip a spoon into the mixture after the 8 minutes and get a bit of the syrup and drop it into a cup of cold water. The syrup will turn into a gooey soft ball if it's at the right stage. Don't walk away from your pot when making a candy syrup! It can go past the proper stage quickly and you'll have to start all over again!
Photobucket
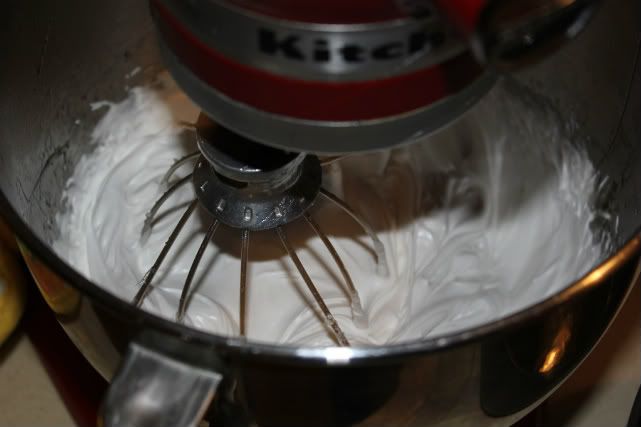
Once the syrup is at the right stage, grab the pot off your stove, turn your standing mixer back onto high, and pour the hot syrup into the beaten egg white mixture. Beat until it is back to room temperature and glossy, soft peaks form (about 5 minutes). I used only half of this meringue on the pie, which I thought was a perfect amount to balance the tart lemon curd, but you are welcome to use it all...pile it high! With a wet rubber spatula, spread the meringue onto your pie (which has had a good half hour now in the fridge). Turn the broiler in your oven to low. Because the eggs in this meringue already cooked because of the hot sugar syrup, you don't need to cook it, but a little browning of the meringue gives it a nice toasty flavor! Place the pie on the top rack of your oven and broil for 1 minute. If it doesn't look toasty enough, give it another 30 seconds, watching it the entire time...that would be HORRIBLE to ruin your pie on the last step.
Photobucket
If making a pie seems like way too much work, you can always just make the lemon curd and enjoy it atop your favorite biscuit, scone, or toast! In fact, I doubled the curd recipe so I'd have leftovers and I used it this morning on top of some raspberry scones. Delicious!

Curd recipe adapted from Nigella Lawson's cookbook, How to Be a Domestic Goddess. Meringue recipe from Steven Raichlen's Healthy Latin Cooking.

Saturday, February 11, 2012

Learning a New Lens

Since getting a new camera for his birthday, Randy has taken lots of pictures. Learning the nuances of a new camera and lens takes some time, but Randy's taken some good shots over the past weeks, at the same time helping document what we've been up to!
Photobucket
Randy and his friend, Aaron have been dying to get up to the mountains and snowshoe. However, the weather has not cooperated. After a storm FINALLY came through the valley two weeks ago, they headed up the hill the following Saturday to enjoy a long day hike.
Photobucket
Photobucket
Photobucket
Although our valley desperately needs more rain, we have enjoyed the warmer weather and gorgeous sunsets (even spending a few nights around a firepit with our neighbors in our driveway)!
Photobucket
All three of our kids take piano lessons...from me. They probably aren't progressing near as quickly as if they had a different teacher (really I just want them to learn the basics of music theory and be able to read music before they pick "their own" instruments in school in the coming years), but I'm saving hundreds of dollars, literally, by teaching them myself! I am so thankful for the ten years of private lessons that my parents gave to me and hope that my children will grow to appreciate and participate in music for their whole lives! I also love that they ask me to practice piano myself when they go to bed!
Photobucket
More fun outdoors!
Photobucket
We enjoyed watching the Superbowl with our friends, the Jacintos. Our children adore their daughter, Lila, and played so well together during the game! They even watched some of it with us, as you can see!

Saturday, February 04, 2012

Red Roasted Quince

For Christmas I received some quinces from a farmer friend of mine and have cooked them up in two recipes this January. This is the first one I tried. But before I get to the recipe, let me show you the quinces.
Photobucket
These are quinces. They are bright golden yellow when ripe, a bit fuzzy off the tree (but the fuzz rubs off when you wash them), and knobbly. They are hard like an apple, but even harder to chop (seriously, be careful). Their inside flesh (and eventually texture) resembles a pear. You can't eat a quince raw, you have to cook it to soften and sweeten it.
Photobucket
I chopped up one of the three quinces and placed in on the stove in a pot with 2 cups water and 2 cups sugar. Bring it all to a boil and let it boil away until the sugar cooks down and becomes a syrup (about 30 minutes). In the meantime, halve the other two quinces and place them, cut side down (inner seeds scooped out) in a 9x9 roasting pan. Pour the syrup with cut quinces over the halved quinces and place in a preheated 400 degree oven for an hour. After an hour, turn the heat down to 325, flip quinces over and baste the whole thing before putting back in the oven for another hour. Do that again (flip and baste) after the second hour and return to over for yet another 30 minutes to an hour, until the quinces are carmelized on the outside, tender if you stick them with a knife, and beautifully red! Yep, quinces do that on their own...change color that is! Something about the tannins that are released when the cook. I don't fully understand it, but it's neat nonetheless!
Photobucket
This ooey-gooey mess it what it looks like out of the oven! According to Nigella, roasted quinces pair well with pomegranates, another winter fruit which we happened to have. So we gave it a try!
Photobucket
Halve one pomegranate and submerge it in a sinkful of water to pull it apart and break out the seeds. It really is a great trick, you don't get splattered with red juice that will stain your clothes and the pith floats to the top while the seeds sink to the bottom! Sprinkle a few of these ruby jewels on the top of a quince half and it is serious sweetness!
Photobucket
After a few bites of this delectable dessert, Randy and I decided we needed to cut its sweetness with a scoop of vanilla ice cream. It disappeared so fast I didn't get a picture!

Recipe adapted from Nigella Lawson's cookbook, Feast.